
Table of Contents
Google Workspace and Exclaimer Cloud Signatures allow you to have a centralised email signature system, that you can deploy to your company quickly and simply.
In the video and blog below we take you through how to set up Exclaimer Cloud Signatures in Google Workspace for multiple domains - also sometimes called aliases. Aliases allow you to receive emails from multiple email addresses into one inbox. The set up that we demonstrate below shows that it is possible to have separate and different signatures go out on all of those email addresses thereby displaying your company identity in a professional manner.
You can either watch the video below which takes you through and shows you the steps required to deploy email signatures across numerous domains or you can read the blog below which also walks you through the steps.
The video has chapter titles for easy referencing.
We are one of the top Exclaimer resellers in the world. If you would prefer to have your email signatures set up for you, would like to have someone walk you through a 30 Day Exclaimer Trial, or if you are looking for a discount on your Exclaimer email signatures, then please reach out on paul@osh.co.za.
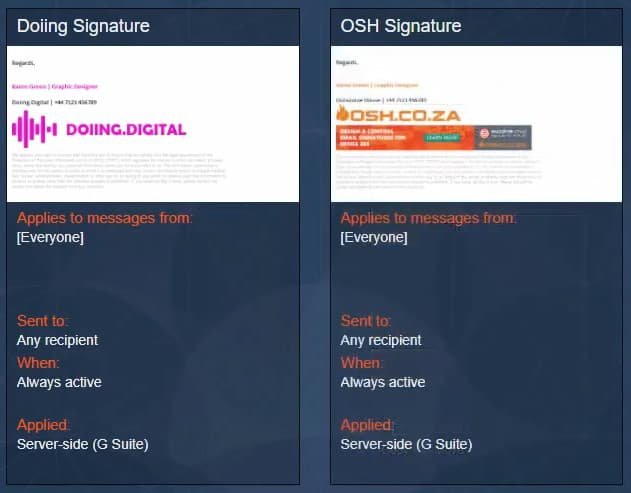
If you have nothing set up, no matter what email alias you send from, Exclaimer will always use the first defined email signature that has been set up.
As you can see from the below image, if I send out my email, it will hit the doiing.digital email signature first. There is no rule set up yet to allow the osh.co.za signature to be activated.
We need to check how your email is formatted so that we can use a Regular Expression to pick a signature when it hits Exclaimer. To do this, send an email from each of your email aliases to an external email. Then go into your "Sent Items" folder and find the emails you sent from each of the aliases.
Setting up @Exclaimer and @GoogleWorkspace with multiple alias domains is easy! Share on XOpen each email and then in the top right corner click on the 3 dots and click on "Show Original".
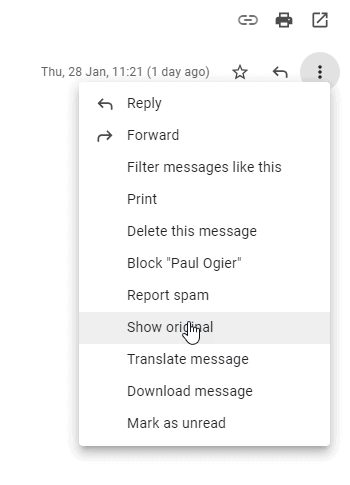
Now that that is open, you need to find the part where it shows that your email is sent from your email aliases.
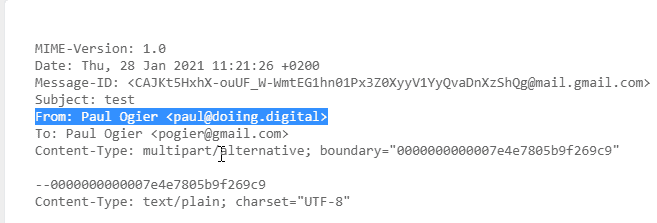
The complete lines for my 2 aliases, are:
From: Paul Ogier <paul@doiing.digital>
From: Paul Ogier <paul@osh.co.za>
Let's now convert these lines into a regular expression for all the users of my company. Depending on your company forms email addresses, this might be a little different.
This is the regular expression for the osh.co.za domain https://regex101.com/r/3nRVQQ/1
^From:\s[A-Za-z]+\s[A-Za-z]+(\s[A-Za-z]+)?(\s[A-Za-z]+)?\s<[A-Za-z]+@osh\.co\.za>The way the regex works is the following:
^ this means that we start at the beginning of the line
"From:" this matches literally. Basically it means that at the beginning of the line is a word "From" followed by ":"
\s then we have a space
Then in my company, we have either people with 2, 3 or 4 names.
[A-Za-z]+ basically says, I am looking for a word with either capital letters or lowercase letters. The "+" at the end of the line means... go until you get to something that is not a word with capital or lower case letters. This means it stops at the space.
Then the pattern repeats again. \s[A-Za-z]+
Then there are 2 of these
(\s[A-Za-z]+)?(\s[A-Za-z]+)?Basically these are looking for another 2 words (2 more names) but this is optional. That is why they are surrounded with a () and have a "?" at the end. The "?" means optional.
Almost there! :-)
\s<[A-Za-z]+@osh\.co\.za>This is the last part of the regex. We have a space again.
Then we have a < which is literal as well.
Then we have the "@" sign then the domain that we are finding. The "\." are making the "." literal. Because in regex a "." can equal anything.
And then finally a > to close this off.
I thought I would give you some other examples so that you can just copy and paste if you need to.
Example 1 - https://regex101.com/r/gCl9KY/1
From: FirstName Surname <FirstName.Surname@domain.com>^From:\s[A-Za-z]+\s[A-Za-z]+(\s[A-Za-z]+)?(\s[A-Za-z]+)?\s<[A-Za-z]+\.[A-Za-z]+@domain\.com>Example 2 - https://regex101.com/r/CwvcJH/1
From: FirstName MiddleName Surname <FirstNameMiddleNameSurname@domain.com>^From:\s[A-Za-z]+\s[A-Za-z]+(\s[A-Za-z]+)?(\s[A-Za-z]+)?\s<[A-Za-z]+@domain\.com>If you have any other options that you are not sure how to make into a regex, please email me on paul@osh.co.za and I will make the regex for you.
If you would like to learn Regular Expressions for yourself, you can get a discount on a Udemy Regular Expression course here.
Let's now set up how the email goes from your Gmail to Exclaimer.
Go to this page under the Google Workspace Admin
Apps > G Suite > Settings for Gmail > Advanced settings
This is the quick link to the Advanced Settings.
Scroll down until you come to content compliance. If you have set your Exclaimer properly, you should see this kind of setting there.

Edit the content compliance rule, and add a new expression after the "X-ExclaimerHostedSignatures-MessageProcessed" Expression.
Your new expression should look similar to this. Put your regex that you made into the Regexp field. And then test the expression to make sure it works. Then click "Save".

We are now going to edit that rule to "Prepend custom subject". This will allow us to filter out these emails when it hits Exclaimer. This will allow us to choose a signature for whichever domain we are sending from.

We have now added all the things to your Google Workspace Admin sections. Please make sure that you have saved everything.
If you have made it this far, well done!
We now need to setup your signature rules to pick a signature when you send an email.
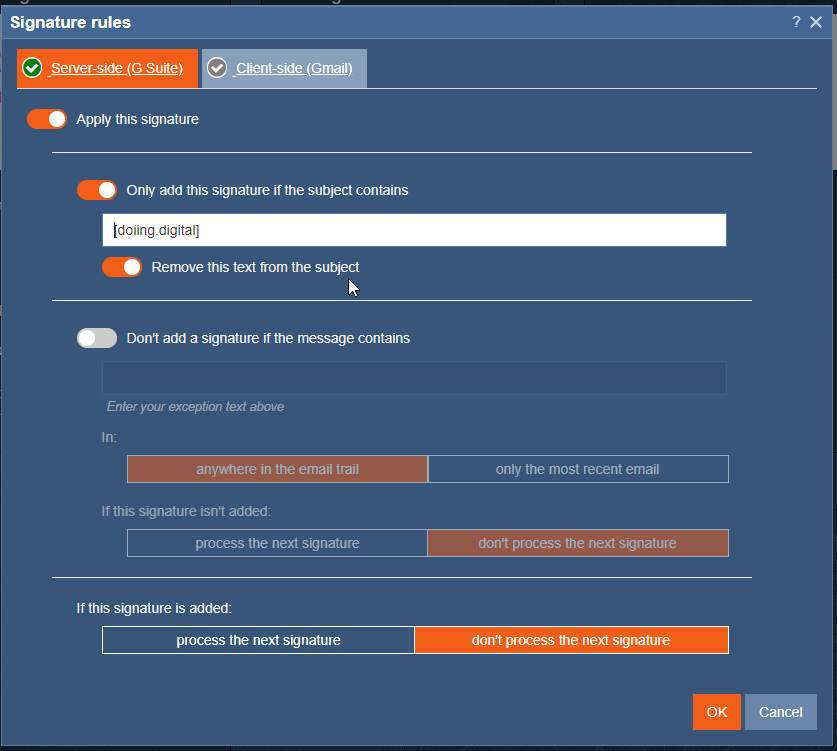
If you have prepended a subject to each alias that you send from you can now set a signature to be picked up based on that subject. Open your Exclaimer portal and hover over the signature that you want to start with and click on "Signature Rules".

When it opens you will see this. Toggle the switch that says "Apply this signature". Then Toggle the switch next to "Only add this signature if the subject contains" and then below that enter the prepended subject that you added in your Google Admin. And finally, toggle the switch next to "Remove this text from the subject". This will remove the subject that you added in Workspace and have a clean subject now.
Do this for as many signatures and rules as you have.
The process to add multiple aliases to Google Workspace (G Suite) and have each of their aliases get their own email signatures, is not very simple, but it is quite logical.
Now that we have proven this concept, we have found that this technique and process allows for a myriad of complex requirements and possibilities that are not possible in any other email signature systems. For example, this also allows you to have multiple signatures for different departments or you can have different signatures for people who have surnames that start with a certain letter - a silly example, but it can be that specific.
If you have any questions about your unique set up requirements, please email me on paul@osh.co.za.
